The Following article is by Israel M. (IzzyMel45) A
Star Wars fan active in the 3D printing community. Izzy printed a vintage Kenner Han Solo blaster for me and is always sending me pictures of his latest projects. The process fascinates me and from the looks of it, is here to stay and may play a more prominent role in the future of
Star Wars.
3D Printing From A Certain Point Of ViewHave you ever wanted a ship, figure, or model from your favorite movie to only find out that they dont make it or you are not quite satisfied with what is available? Thats where 3D printing and 3D modelling comes in and where your limitation is, in fact, your imagination. If you can think of it or see it in your minds eye, you can build it. But the main question is, where do I start?
For me, my introduction to 3D printing was when I was fortunate to meet a fellow R2 builder, Brad Ruprecht, who was kind enough to show me the parts he printed for his Droid. I was blown away with the accuracy and detail in the parts. Thats when I realized the possibilities of 3D modelling and 3D printing! And just like that, I was hooked. However, at the time 3D printers were still not within my budget.
In June 2013, my Children bought me my 1st CTC 3D printer for Fathers Day. I was so grateful for this gift. I ran to my PC and went straight to Thingiverse.com. For me it was all about looking for anything related to Star Wars that could add to my Star Wars collection. I first started downloading any blasters I found. Then I moved onto any models of ships I could find.
Once I had the STL files I was looking for, I loaded files into the slicer and used the default settings and tried to print these files. Well, I found out quickly it wasnt that easy and that there was a learning curve. Slicing, bed levelling, layer heights, PLA or ABS, Temperature settings for both the hot end and the bed. What did this all mean? Thankfully, my friend Brad, who works with 3D printers for a living, was willing to take the time to guide me through this process. Today you can find tons of videos on YouTube, 3D printing communities, and forums that will easily explain all of this information and then some.
As time passed I found myself looking for items that havent been made for 3D printing and again I looked to Brad for advice. I asked him, what Software programs are available to design all these ships that I had in my mind? Before Fusion360, you had AutoCAD, Blender, and MAYA3D just to name a few that I looked at. These programs, for me, had a steep learning curve. My friend told me about SolidWorks, 3D modelling software. I found that SolidWorks is available for free for those individuals that served in the military, so I jumped in with both feet and ordered a copy. I began by looking for any beginners SolidWorks tutorials to teach myself how to design and create my own files.
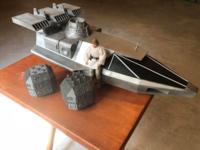
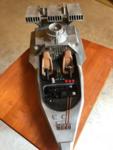
One of my very first designs was the PSI holder for my R2 Dome. Prior to this design I was using a PVC tube, white Lexan lenses, and a wire mesh pattern for the Dome. I used the program to design the PSI front and back cover and used the slicer program to print it with a honeycomb infill. To me it looked great and thats what I currently have in my R2 Dome. Once I had the basic concept on SolidWorks, I moved on with more complex items. I just finished my 1/6 scale X-wing Cockpit and I began to work on the design of my 1/6 Falcon Cockpit with help from Greg D, AKA SofaKing01 over at the RPF forums. I found through my research that a lot of the greeblies in the Star Wars universe are repetitive throughout the ships and set designs. I really didnt want to recreate everything from scratch and I wanted to be able to recreate it the same way every time. The best way for me was to design it and print it. Designing the greeblies forced me to go beyond the basics and learn about surfacing techniques in SolidWorks. By no means am I an expert, but Im still learning. When I first started designing, it took me a month just to design one of the item (such as the Volvo panel, Vickers Yoke and the Rebel Hoth Turret). I was able to cut down my time substantially through repetition and memorizing where all the keys/functions were. I went back to some of my original 3D designs after feeling more comfortable with surfacing and reworked these greeblies with greater precision and was able to be more accurate with the details such as the Tatooine boxes, the Rebel Blockade Runner or speeder.
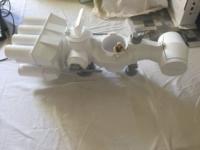
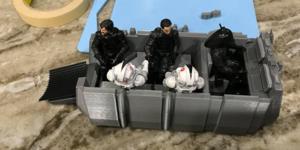
Im still working on my Falcon Cockpit, doing my best to make it as accurate as possible with the greeblies Im designing and printing. Meanwhile, I have also branched out in making other parts for Dios and ships that werent being made (Gunner Station, Background Speeders, Blasters, Ships, etc.) The hardest part now is finding reference material. Fellow Star Wars fans out there helped me out. As I began to post pics, Star Wars fans from all over pointed me in the right direction and so I could make them more accurate.
Even if you dont have a 3D printer, Fusion360 is available out there for anyone to play with and design your own models. There are companies such as ShapeWays that will print your design for you. Dont let the lack of a 3d printer stop you from making your dream diorama from coming to life. I highly encourage anyone to take that first step into the world of 3D design and 3D printing.
You can check out some of Izzy's video's here on
YouTube, and in the
Star Wars 3D Models Facebook Group.